Wednesday, April 13, 2011
adding a domain to phplist
Added the top-level domain mobi to phplist as given at this post, in the admin/commonlib/lib/userlib.php file.

Tuesday, April 12, 2011
bounce processing cleanup
Once again, bounce processing had stopped on phplist. My hunch is that this happens due to mails sent at times when bounce processing is supposed to take place - if the processing fails during the batch, then the next time the spool file is left in a way that processing fails again. So, as usual, the mitigation is to do the following as root:
rm /var/mail/the_relevant_spool_file touch /var/mail/the_relevant_spool_file
chown the_relevant_account:mail /var/mail/the_relevant_spool_file
chmod 660 /var/mail/the_relevant_spool_file
Once this is done, bounces are processed - if checking is necessary, can run the commandline process if a cron scheduled bounce process is at least half an hour away.
rm /var/mail/the_relevant_spool_file touch /var/mail/the_relevant_spool_file
chown the_relevant_account:mail /var/mail/the_relevant_spool_file
chmod 660 /var/mail/the_relevant_spool_file
Once this is done, bounces are processed - if checking is necessary, can run the commandline process if a cron scheduled bounce process is at least half an hour away.
Monday, April 11, 2011
google multiple sign-in
Finally enabled multiple sign-in for my gmail account, so I can now blog in Firefox instead of shifting to IE as before. But as of now it works with these services only:
So turned it off again, since blogger and groups are not supported, and it disables offline gmail.
- Code
- Calendar
- Finance
- Gmail
- Profiles
- Reader
- Sites
- Voice
- Docs (Google Apps accounts only)
So turned it off again, since blogger and groups are not supported, and it disables offline gmail.
Saturday, April 09, 2011
small gotcha with blogger's compose mode
I had noted this before, but not documented it - copy-paste into the compose window does not work with (at least my installation of) IE8. Copy-paste only works into the Edit HTML section, but that strips out all links. So, for copy-pasting long posts with links like this one, I used Firefox. Why do I not use Firefox all the time for blogger? Because I have multiple google accounts for different blogs, and as of it seems easier to open one in a different browser than go through google's hoops for multiple login (if at all it is possible).
Logic gotchas and finally Reaper to the rescue!
The Studio got a Macbook Pro for Mandir recordings along with Logic Express for multi-tracking. According to the Wikipedia, the only differences for me between Logic Pro and Logic Express are the lack of 5.1 mastering and extra content - so Logic Pro is not required for my use. Anyway, when I tried to use it with the Tascam US-1641 and the Korg NanoKontrol and chronicled my adventures.
Initially when I created multiple inputs and tried to record-enable (arm) only one of them, all of them were being armed! This turned out to be a problem with the control mapping (I think) where the control was set to "arm selected track" instead of "arm track 1", and by creating multiple tracks simultaneously Logic had also selected all the tracks. Later, using the Deselect all menu item, this was resolved.
One of the most important things was a control room mix - doing an AFL (After-Fade Listen). Googling gave this google books link which confirmed my hunch that the only way to do an independent AFL would be to make sends to duplicate tracks (Buses in Logic) which are routed to a different output and mute those buses which I don't want to listen to. All right, I did that.
Then, the mapping of the NanoKontrol buttons and faders. Logic too has a "Learn Mode", but it is somewhat less user-friendly than the Reaper one, at least in my opinion. Click Learn Mode (it is difficult to see if it is enabled or not - this is a general problem with the MacOS buttons) and move a fader or button, then click on the onscreen control you wish it to be mapped to. Logic does the mapping without any success dialog box, and silently waits for the next fader or button. This caused some initial confusion till I got the hang of it. Also, Logic goes the route of allowing multiple actions per button press (or fader move) on the control surface, instead of Reaper's more elegant 'Actions'. So, for my requirement of muting 13 (out of 14) Aux Buses for AFL of one channel, I needed to map that button 13 times to 13 channel mutes. Makes a big mess on the MIDI mapping page. But at least it works.
Then another small gotcha - Logic by default trims any send to -inf dB! Tried buses, couldn't hear any output, till I figured out that the sends needed to be manually set to 0 dB or whatever using the dinky rotary control next to the send!
More Reaper features which I missed were: no customization of filenames of recorded files, un-intuitive LED graphs where -20 dB shows up as only a sliver of light! and far less complete realtime updating of recorded track. Also, probably it does not have the ability to add markers directly to the recorded wav file as in Reaper, though I did not test for this.
Then came the slow realization of the vital missing feature - without which Logic would be almost useless for me - cannot enable or disable EQ, effects etc on the fly onscreen while a recording is going on! (except maybe with mapped MIDI commands). So I went on a lookup and saw this DAW comparison wikipedia page, which mentions that Reaper has a MacOS version. Immediately downloaded, so now I can put my license in it due to Reaper's generous license terms,
Your license allows you to use REAPER on one computer at a time. Multiple REAPER installs for use by the same person are fine (home/studio/laptop, Win32/x64/OSX).and get going.
Friday, April 08, 2011
sharing files between Windows7 and XP
N got a Lenovo with Windows 7 pre-loaded. S wanted to be able to share files between his Windows XP machine and this one. I googled and found this technet forum link which basically says these steps:
- Make sure both are in the same Workgroup
- Verify in Advanced Sharing settings on Win7 that Network Discovery, File and Printer Sharing, and Public Folder Sharing are all set to “on” and Password Protected Sharing is set to “off”.
- Right-click and share a folder.
- Right-click and change security settings on the folder, to allow Everyone access. Type Everyone in the Security box and click the Add button, giving appropriate read write permissions.
- Make firewall changes if required, not applicable for us.
Using that, I made an entire drive (I:) on the win7 pc shared, and visible from the xp machine. But that share does not allow writing, for some reason. But other folder shares we made allow write from the XP machine. So, probably we can share folders but not entire drives in Win7.
I think it also requires identical usernames and passwords. Since my account on both machines is exactly the same, I am not asked for a pw when I use my account. But with the admin account, it asks me for username & password. When I give the Win7 administrator username and password (Both Case sensitive!) then it allowed read and write. Probably it might have worked with any other credentials on the Win7 machine too, since Everyone had permissions on that folder.
upload issues with the new internet connection
Sometimes, the upload script was timing out. My hunch was that this was during times when there was intense network activity from others on the network - mostly http uploads. So this was my checklist to mitigate:
- Check if the router lights are blinking madly. If not, then you have no problem, you can upload.
- One more check may be to check in cyberoam if traffic has been dropped in the IDS - in the dashboard. If yes, you could restart management services. (If traffic is being dropped, DNS may fail and you may not be able to connect to outside servers.)
- If lights blinking madly, you can put the 512 kbps speed limit for http in cyberoam. For this, the procedure is as follows.
(a) In cyberoam, go to Firewall -> Manage Firewall -> LAN to WAN
(b) There you have to edit rules 1 and 2 - both of them are duplicates. You need to go to bandwidth policy and choose 512 kbps and save changes.
This will limit outgoing traffic to 512 kbps, so incoming ssh will not be timed out.
adventures with PING
A guest post from S:
The task I wanted to accomplish : Increase the space in C:\ partition (primary) by shrinking other partitions. I had D & E as Logical partitions. Cleared E to make it empty. It was a 60 GB ATA HDD. C was 12 GB, D & E sharing the rest in an extended partition.
I had :
a. PING 3.0 CD for backup. (I had used it earlier to restore primary partitions to identical machines/partitions with success. )
b. Lucid Puppy Live CD for useful tools like Gparted, Batch Renamer etc.
c. Ultimate Boot CD, just in case required.
Backed up C & D using ping to ping-images named PingC and PingD, just in case required. This would come in handy as things went wrong. During backup, C was seen by Ping as hda1 and D was seen as hda5. The backup image folders were written to USB External HDD.
Booted with Puppy for Gparted. It so happened, E being empty, wasn't reason enough for C to expand. Deleted D, thinking I would be able to restore later. C had all the space it needed to expand, yet it didn't. (??)
Deleted C, too and re-did the partitioning, thinking backups were handy anyway. Turned out, I would run into restoration problems.
Tried to restore C, from the image, to the now expanded C partition. Hmm, it failed. Apparently, as noted here, resizing of the partitions may be a problem ?
Firstly, PING would ask "where your images are stored" (the source of restoration), but at no point, it would ask "where do you want to restore to" (destination for restore). I had noticed this in my earlier experiences with PING, but in those case, didn't bother and it still worked because the backup and restoration environs were identical in size, order of partitions and hardware. This time I had re-done the partitioning. This problem has been noted by other PING users in forums, and I guess, by default, PING attempts to restore to the identical partition which you backed up from. This was noted at one of the forum posts, but not in PING's documentation.
Secondly, towards the last step ( just when you expect it to kick off the restoration), PING would ask something like "We found additional space in the partition you are trying to restore. Do you want us to extend the partition for you after restoration ? " . This problem too has been noted by other users. Here, either way you are caught, because I had tried both in different attempts (every time clearing up and redoing the partitioning). Either way it failed saying "Partitioning failed. May be, you have to do it yourself". If you didn't have a backup, the strange behaviour here can sometimes lead to catastrophic results, like here. btw, PING's errors and notifications are strange, they are in first person/second person in conversational lang (Some exasperation on this, here) . Like, after identifying drives, it would say "So, everybody is here". :) :)
Thirdly, during one of my many attempts with various combinations of answers to PING's questions, it "accidentally" restored the C partition successfully. This problem is also noted by a PING user in the forum. If you press the Cancel Button at one point in time, it would go ahead and kick off the restoration and finish it. (Natan acknowledges in the forum post that all is not well with the Cancel button behaviour).
However, after the above restoration, Gparted showed weird partition info. It showed the entire drive as unallocated. Pmount (in Puppy) failed to mount the partition giving an error. But Windows booted, hahaha. But it showed only C parition at 12 GB. I had had some Program Files in D, because C had run out of space. Since D hadn't been restored, I had a strange situation like IE works but Firefox doesn't, KM Player works but VLC doesn't and so on, because those other software were installed in D.
Windows XP's Disk Manager had even weird things to show. It showed drives as huge as 800GB with unallocated free space (where did she get that) and also a 23 GB unallocated space and another 230 GB unallocated space. When I tried Windows to create partitions in unalloacted free space, it failed. This problem of weird partitions sizes after a PING restoration attempt is also noted by other users in the forum. ( Can't dig the link now, don't remember).
In other attempts, I also tried PartImage from the UBCD to do the restorations. (PING is built around PartImage, I guess). That too failed.
In the meanwhile, my room-mate [Edit: me :)] suggested, 'Can't you mount D's ping image and copy files from there and worry only about C's restoration'.
Part of this suggestion would come in handy. Looked up on ways to mount a PING image. Unfortunately, this is not possible with PING, but while confirming this, Natan had suggested in an earlier forum post, that you could restore it to some other partition/machine and copy files from there.
Finally, after many rounds of trial, with every time re-partitioning from scratch, and I was about to give up, I bumped into the forum post, where Natan had suggested a solution for a similar situation of problems with restoring extended partitions. I took a clue from there and did the following.
Restoring only D :
1. In the PingD image folder, renamed hda5.001 to hda1.001, hda5.002 to hda1.002 and so on for all the zip files. Effectively, fooling PING as if it was an image of C.
2. Deleted the "hda" file created by PING.
3. Created a blank text file, called hda.
4. Deleted the "hda5-first sectors.txt" file created by PING.
5. Re-did the partition table, to create one big 55GB primary partition.
6. Tried now to restore PingD to hda1 as identified by PING. Strange, isn't it, since it is the D partition files that are getting restored to the primary partition.
7. When asked "whether you want PING to extend the additional space", say Yes.
8. PING completes restoration.
9. Boot with Puppy, mounted the partition and saw the D files in it.
10. Remembered my room-mate's suggestion and copied the D-partition files from HDD to USB External hard disk.
Restoring only C :
1. Deleted partitions, Re-did the partitioning, to create one big 55 GB primary partition.
2. In the PingC image folder, Deleted the "hda" file created by PING.
3. Created a blank text file, called hda.
4. Deleted the "hda5-first sectors.txt" file created by PING. (Strange, but it worked only after I did this deletion and creation of blank stuff).
5. Restored C successfuly, similar to steps 6 to 9 above.
Back to Puppy, Gparted showed a good C partition, was mountable.
Used Gparted to shrink C. Created the Extended partition, Logical partition and so on for D & E.
Copied the D-partition files from the USB external disk, including Program Files.
Windows XP now booted neatly. I now had enough space to provide for hibernation, additional space for the page file and 15% space for defragmentation.
At the end of two nights, all is well that ends well.
In retrospect, it's quite possible, some of these steps are silly and illogical and there are better simpler ways to do these things or to find the answers earlier on. Whatever, allow some crazy stuff for a novice like me in the open-source world. Also, there must be more sophisticated ways to do this from scratch from the Shell command prompt, as noted by Natan here.
Don't ask me whether I could have reinstalled Windows XP on Day 1. Haha, I could have. Had it ready, but I wanted to book something to adventurous exploration :) and open source problem-solving. Also, I had always relied on PING, it can't fail me now, so I have to find ways to make it work. :) :) It's a very useful piece of software and I love it. :)
Wednesday, April 06, 2011
speed tests
The new network is supposed to be 10 Mbps 1:1. The main requirement for this sort of speed would be uploads. Checking out Vimeo upload speed, got 0.27 MB/sec which is around 3 Mbps. 108 MB in around 8 minutes. Probably speed limited by vimeo server, I suppose.
In case vimeo upload is slower in the Studio, that will probably be due to filtering being done by cyberoam. We can disable cyberoam filtering for a particular user or machine to make it faster for vimeo uploads, or connect a machine directly to the public-ip subnet on the DLink.
After doing the speed tests, there was a false alarm when I found ftp transfer to my machine was going at only 25 Mbps when connected through a 100 Mbps link after the router. Later concluded that this was because of wifi being used at the last hop. Removed the wifi and connected by wired LAN and the transfer became 75 Mbps, no problems.
In case vimeo upload is slower in the Studio, that will probably be due to filtering being done by cyberoam. We can disable cyberoam filtering for a particular user or machine to make it faster for vimeo uploads, or connect a machine directly to the public-ip subnet on the DLink.
After doing the speed tests, there was a false alarm when I found ftp transfer to my machine was going at only 25 Mbps when connected through a 100 Mbps link after the router. Later concluded that this was because of wifi being used at the last hop. Removed the wifi and connected by wired LAN and the transfer became 75 Mbps, no problems.
Monday, April 04, 2011
configuring the DFL-210 router without NAT
The studio got a bunch of IP addresses on a different subnet and a single IP address to connect to the ISP. Using the old DLink DFL-210 router to do the routing, steps to get it working were:
 (This means that all packets meant for ip addresses in lannet should go to the lan interface, all packets meant for the outside world - all-nets - should go to the wan interface and so on.) Even though "all services" are enabled, the router is intelligent enough not to allow access to its control panel from WAN port - accessing it gives an error 403.
- remove the firewall rules mentioning NAT.
- add a single firewall rule with all services allow as below.
- Add appropriate IP addresses at the LAN and WAN end in the 'address book'.
- Routing is already enabled as below by default, so nothing else needs to be done.

 (This means that all packets meant for ip addresses in lannet should go to the lan interface, all packets meant for the outside world - all-nets - should go to the wan interface and so on.) Even though "all services" are enabled, the router is intelligent enough not to allow access to its control panel from WAN port - accessing it gives an error 403.
Sunday, April 03, 2011
ssh in from macbook pro to saiwaves and others
First I tried the default method given in my earlier post. The thing to remember is, how to navigate to hidden folders in Finder - use the Go Menu -> Go to Folder (Command+Shift+G)
Tried by copying the contents of the id_rsa.pub from a Windows machine into the ssh terminal there, to the authorized_keys file. Did not succeed. Permission denied (publickey)
Thought it might be some permissions problem, tried changing
chmod 755 .ssh - still no go. So changed it back to 700.
Some posts suggest using DSA instead of RSA on OS X. "Don't use RSA"! So, tried with DSA as given here, using ssh-keygen -d instead of ssh-keygen -t rsa and also not copy-pasting the key from Windows or Mac but instead doing a cat id_dsa.pub >> .ssh/authorized_keys2 - this time it worked immediately.
Friday, April 01, 2011
migrating google sites to google apps
Googling showed that the procedure for migrating google sites from one account to another is given at this blog post. It has to be done by the "owner" of the site.
- Share the site as owner with the new GApps account.
- Log in with the new account, and after clicking on the notification email to go to the site, go to More Actions -> Manage Site -> General -> Copy this site.
lots of interesting online apps
A had sent me a link to a large collection of online apps from techsupportalert,
www.techsupportalert.com/content/best-free-online-applications-and-services.htm
I've not yet tested all of them, but I created a pan online with www.dermandar.com here.
Also tried out a one-page OCR with www.onlineocr.net - that also worked nicely.
www.techsupportalert.com/content/best-free-online-applications-and-services.htm
I've not yet tested all of them, but I created a pan online with www.dermandar.com here.
Also tried out a one-page OCR with www.onlineocr.net - that also worked nicely.
Saturday, March 26, 2011
error while importing files into database
When I ran our usual main_ftp script to import audio files to local database, it gave a strange error:
/home/sgh/scripts/question: error while loading shared libraries: libgnomeui.so.32: cannot open shared object file: No such file or directory
and the same message repeated on and on kept scrolling. Later, realized that three of the files were wav files instead of mp3, that had triggered the errors! Removed the wav files, replaced with mp3 files, all fine.
/home/sgh/scripts/question: error while loading shared libraries: libgnomeui.so.32: cannot open shared object file: No such file or directory
and the same message repeated on and on kept scrolling. Later, realized that three of the files were wav files instead of mp3, that had triggered the errors! Removed the wav files, replaced with mp3 files, all fine.
Thursday, March 24, 2011
problems during first fulldome show
So we had our first fulldome show - two shows actually. The problems we faced were:
- projector doesn't switch off with remote - have to lean around to switch off using the button on the unit. Another workaround is to change the input to another non-active input and then power off.
- avs files give error on first try, intermittently - this seems to be because the machine and or hard disk cannot keep up. Solution is probably to render the AVISynth files as avi files.
- alignment may be improved - probably increasing the height of the mirror might help to reduce the height of the horizon at the front of the dome, by increasing the angle of tilt of projection.
Another innovation would be to remove the need for the 110V system altogether - currently used only for lighting - by using the video projector itself for lighting. Still frames like the one below, made into movies with AVISynth.

Tuesday, March 22, 2011
avisynth and virtualdub for fulldome show
After warping with tgawarper, and rendering with virtualdub to make a movie, decided to do non-destructive edits with avisynth for making the credit appear at the beginning (so that the audience wouldn't walk out during the end credits!) and for the intro and outro videos. For the intro and outro videos, it turned out that taking 4:3 video as the source, I could just make the video occupy a 640x480 rectangle near the bottom of the 1920x1080 screen, and it would come out reasonably well though much enlarged when reflected with the mirrordome. This conclusion was reached after much trial and error using the General Quadrilateral Transform filter from here. The settings were as follows:
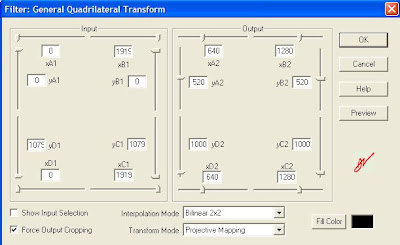
The last line being actually on a single line with all the ++ etc. The outro also had some gymnastics because of an extra line of audio I wanted added. This was before the Virtualdub quadrilateral transformation:
video=Trim(DirectShowSource("VTS_01_2.VOB"),750,4690)
blank=BlankClip(video,length=750, color=$000000)
blankaudio=DirectShowSource("30sec_48k.wav")
video_pre=AudioDub(blank, blankaudio)
video_pre ++ video
Finally, all the three - intro, outro and the show itself - were put in a KMPlayer playlist, a .KPL file.

1000 - 520 = 480 and so on.
Except for simple FadeOut and Trim commands, the intro video was relatively straightforward. The show video itself had some extras, including a subtitle call for adding the Indian voices to the credits. The file was as below:
video=DirectShowSource("TSPOG_2k_w.avi")
audio=WavSource("TSPOG_IN_stereo.wav")
mix=AudioDub(video,audio)
Trim(mix,0, 3085)
++ subtitle(Trim(mix,39024,40504), "Indian voices: K, A, V", -1, 1000, align=2, 651, 699)
++ FadeOut(Trim(mix,3116, 37816),60)
The last line being actually on a single line with all the ++ etc. The outro also had some gymnastics because of an extra line of audio I wanted added. This was before the Virtualdub quadrilateral transformation:
video=Trim(DirectShowSource("VTS_01_2.VOB"),750,4690)
blank=BlankClip(video,length=750, color=$000000)
blankaudio=DirectShowSource("30sec_48k.wav")
video_pre=AudioDub(blank, blankaudio)
video_pre ++ video
Finally, all the three - intro, outro and the show itself - were put in a KMPlayer playlist, a .KPL file.
Friday, March 18, 2011
MediaWarp3D evaluation
Tried out MediaWarp3D - had been in touch with one of the guys involved in developing it. Priced at $995. On my machine - Athlon X2 Dual core at 1.9 GHz, 2.75 GB RAM, nVidia GeForce 9100 M G - only one of the two windows could be running for a full fps Real-Time Warping. If both windows were open, drops to 15 fps or so. Has options for 3D, but since I neither have the hardware nor the content, couldn't test the 3D part. A screenshot is here.
rate of sending emails
This morning, there was a gateway mixup - the SMTP firewall rule was pointing to a disabled gateway, so the emails did not go through. After I changed it, checking the number of mails pending with sudo qshape incoming active deferred found that the mails were going at the rate of approximately 20,000 per hour. Of course, services like yahoo which had rate limiting would queer the pitch, but otherwise this was the rate for a 1 Mbps line, I believe.
Wednesday, March 16, 2011
bat file to start IMs
Going offline in three chat apps and coming back online later was a bit of a pain. So, exiting them instead, and made a bat file to start all three of them at once. But for running Windows apps in a BAT file, and to continue execution (similar to putting a task in the background on *nix) the syntax is:
START C:\Progra~1\PATH\TO\FILE\IN\DOS\STYLE\file.exe
START C:\Progra~1\PATH\TO\FILE\IN\DOS\STYLE\file.exe
migrating mail from GMail to Google Apps and so on
While discussing the sssihl migration, where they have an edu GApps account and hence can use GApps IMAP migration tool, S mentioned that some other institutions like MedTrust had similar requirements. But they're using the Standard (Free) Edition.
For just a single account to another account, the migration would be possible, though slow, by just adding both accounts as IMAP accounts on a desktop client like thunderbird, making sure that emails are retrieved completely and not only headers, and dragging and dropping from one account to the other, as given in this discussion.
In the link above, the popular answer is the way it's being done with the IMAP migration tool on the Edu version. But the lifehacker link just below that gives this other method.
For just a single account to another account, the migration would be possible, though slow, by just adding both accounts as IMAP accounts on a desktop client like thunderbird, making sure that emails are retrieved completely and not only headers, and dragging and dropping from one account to the other, as given in this discussion.
In the link above, the popular answer is the way it's being done with the IMAP migration tool on the Edu version. But the lifehacker link just below that gives this other method.
Subscribe to:
Posts (Atom)